Posts Tagged ‘Earth and Space’

Edible Sedimentary Rocks

Monday, March 3rd, 2014

edible-sedimentary-rocks

This post contains an affiliate link. I was compensated for my work in writing this post.

The highlight of our rocks and minerals study was making delicious edible sedimentary rocks, a layered treat overloaded with sugar. Look away from this page if you are on a diet! My own kids are skin and bone, so this treat put some meat on my kids, and a small-ish slice I ate (okay–fine! I had many small slices!) reminds me of the mud pies in Malibu, California.

We are continuing our  homeschooling science posts about Earth and Space by Bright Ideas Press. The recipe for the edible sedimentary rocks comes from this book, and I will give you a video tutorial for how to make this delicious treat at the bottom of this article. If you can’t wait that long, go ahead and scroll down right away to begin your sugar rush.

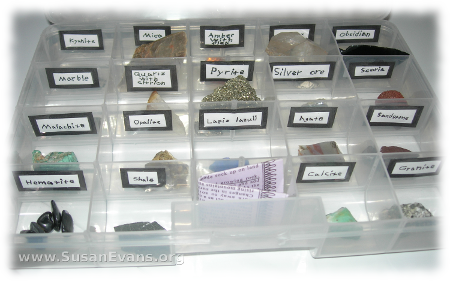
My kids have collected rocks and minerals for years, and when we studied the different types of rocks, they remembered the differences between igneous, sedimentary, and metamorphic rocks. Take a look at one of our collections, which we have organized in a labeled tackle box:

rock-collection

When you are studying rocks and minerals, you should really go ahead and do some experiments on the rocks, like plopping them into vinegar to watch them fizz. Here is a free PDF from the National Museum of Natural History. Scroll down and print out the last page for your kids. This is a chart. Go ahead and do the different experiments listed in the PDF, and have your kids enter the results into their charts. Place the chart into your Earth and Space notebook.

We have now arrived at our grand finale, our pièce de résistance:

How to Make Edible Sedimentary Rocks:

Caves Unit Study

Monday, February 24th, 2014

caves-unit-study-2The following article contains an affiliate link. I was compensated for my work in writing this post.

cavesIf you do a caves unit study with your kids, you really ought to go visit a real cave. Try to find one in your area. Looking at real stalactites, stalagmites, and columns in the depths of a dark, dripping cave in the recesses of the earth is an experience every child should have.

We are using the chapter on caves from Earth and Space by Bright Ideas Press as the jumping-off place for this unit study. The book provides 14 vocabulary words that you can write on index cards, so that you can know the basic vocabulary having to do with caves. We labeled the three main cave formations on a printable page provided in the book: stalactites, stalagmites, and columns. My kids also colored a beautiful cave coloring page:

caves-unit-study

We also did the science experiment to grow a speleothem (a cave formation) using Epsom salts. Because our air is extremely dry, growing crystals is difficult. We had to re-start the experiment when I discovered that the string was bone dry on day 3. The string has to be wet for crystals to form. My husband told me to put a cardboard box over the entire experiment to retain the humidity, and it worked better. We filled in a chart provided in the book, drawing the crystal formations over the course of 10 days.

stalactite-experimentMy daughter and I decided to create a cave out of terra cotta clay, pictured at the top of this post. Isn’t it pretty? It took us a total of 5 minutes, since the clay was softer than usual. We formed stalactites, stalagmites, and columns.

If you are unable to go to a real cave during your caves unit study, here is a virtual tour of a cool cave, as well as a fun cave art activity:

If it’s snowing outside, you might want to build a snow cave. Then grab a flashlight and have fun inside your cave. Here is a video tutorial, with tips on how to be successful with making snow caves:

Look at the icicles hanging off your roof, and explain to your kids how stalactites form the same way!

Here is an underground cave map, to help you identify the different cave formations:

Finally, here is a video describing all the activities that can be done during a Caves Unit Study:

Make Your Own Volcano

Monday, February 17th, 2014

make-your-own-volcanoThis article contains an affiliate link. I was compensated for writing this post.

I’m going to show you a short-cut on how to make your own volcano, invented by my husband. We are continuing our study of Earth and Space by Bright Ideas Press, and we are doing the volcano chapter this week. The hands-on activity is to make your own volcano, and the book tells you what ingredients you need for the eruption.

But first, I wanted my kids to fill out the diagram provided in the book. One of my sons made the lava into a groovy psychedelic orange, red, and yellow design. Isn’t it cool?

volcano-diagram

Next we experimented with the eruption itself, using an extra pop bottle. My husband didn’t seem to mind erupting it over and over, and the kids squealed with delight, as you will see in the video.

make-your-own-volcano-4

We grabbed several volcano books out of the library, and we own a volcano video, so the kids enjoyed watching lava come out of volcanoes before we erupted our volcano model.

I’ve seen a real volcano erupting when I grew up in Guatemala. The orange glow looked really interesting against the dark sky, as I stood on the street in front of my house. I also climbed a volcano and looked down into the crater. It was still smoking. I asked my teacher if it was safe to be climbing that volcano, and he refused to answer…

make-your-own-volcano-3

Just so you know, this version of a volcano took 5 minutes of spraying with spray foam (let it dry overnight), plus 5 minutes to chop off and hot glue the foam, plus 5 minutes to smash the terra cotta clay onto the volcano structure. So it took a total of 15 minutes. It was easy and fun.

make-your-own-volcano-2

And now, ladies and gentlemen, here is our video on how to make your own volcano:

Plate Tectonics and Earthquakes

Monday, February 10th, 2014

plate-tectonics-and-earthquakesThis article contains an affiliate link.

When my kids studied plate tectonics and earthquakes, we did some super fun hands-on activities. We are continuing our study of Earth and Space by Bright Ideas Press, and the highlight of this unit was to shake a Lego city to see what would happen during an earthquake. My kids kept setting up cities and shaking them down all week long.

tectonic-plates-2I’ve actually lived through many earthquakes. I grew up as a missionary kid in Guatemala, and I survived the 1976 earthquake, which was a 7.6 on the Richter scale. I remember the demolished city, where I could see inside the houses with knocked-down walls. It was kind of surreal. I tell you about it in the video. I also show you the hands-on activities we did for this unit:

The children looked up a list of cities where large earthquakes have happened, and we noticed that the majority are located around the “Ring of Fire.” This is the edge of the tectonic plates, where lots of volcanoes have formed. We colored a printable that showed where the tectonic plates are located, and another map where the Ring of Fire is located. The children noticed the similarities.

ring-of-fire

plate-tectonicsTo understand tectonic plates, one of the activities in the book is to boil an egg and crack the outside shell. In order to see the edges of the shell pieces better, you might want to color the egg like an Easter egg, with food coloring. Use 1 cup of boiling water, 2 teaspoons of vinegar, and several drops of food coloring. The longer you leave the egg in the dye, the brighter the “tectonic plates” will be. Make sure you crack the shell before you dye the egg, so that the edges of the shell are darker.

We had fun studying plate tectonics and earthquakes. After the kids were in bed, my husband and I reminisced about how much we missed earthquakes back when we lived in California. Isn’t that funny?

Bright Ideas Press compensated me for blogging about science through using the book Earth and Space.