My children re-enact the story of Balaam’s donkey in this video. We happened to have a horse costume that we picked up at a yard sale, which made a perfect donkey. One of my sons was an angel dressed in white, with flashing swords in his hands. Balaam wore a tunic and kept pretending to beat his donkey, because he thought the donkey was being stubborn. In reality, the donkey was blocked by the angel. Finally the donkey started speaking, startling Balaam.
Posts Tagged ‘Homeschooling’
Balaam’s Donkey
Tuesday, November 30th, 2010Embossing: Ancient Egypt Craft
Monday, November 22nd, 2010
Embossing is harder than it looks. Of course, the copper sheeting from a craft supply store is probably much thinner than the stuff I ordered over the internet. First I used kitchen shears to cut the metal sheeting to the size I wanted, since it was in a roll. Then I taped the copper sheet to a piece of craft foam. You can use anything, even a stack of papers, to make it soft on the other side.

Then I used a ball-point pen to draw an Egyptian design onto the copper. I drew a large bird with wings, similar to many Egyptian necklaces. I chose the design because of the feathers, because I thought raised feathers would be a cool effect.

When I was finished drawing with a ball-point pen, I took the tape off and turned it over. I used the edge of the cap of the pen (attached to the pen) to press down on both sides of each line. Basically, you’re helping the embossing to be more pronounced. When I was finished, I took black paint and brushed it over the whole thing. I was expecting something spectacular, but it was ho-hum. In fact, none of the ink remained in the grooves. So that effect didn’t work at all. Maybe I used the wrong paint. The YouTube videos say to use black ink, but I don’t have any, and I don’t want to buy any because I have no use for it. Embossing equipment was also recommended in those videos. Given my negative experience, I have no desire to shell out money for something that is frustrating.

I recommend using a washed-out pie tin from the store for your first attempt at embossing. That way you will be more familiar with the process and decide whether it’s worth it to spend money on it. I found many how-to videos on YouTube, many of which spoke about making embossed metal into Christmas ornaments. That would be another idea to explore. Also, it seems like if you got an embossing kit from the craft store, it might be super easy to do after all. (The cap of the pen, for example, was way too fat to puff out the other side of the metal like I was trying to do.) But for now, I give the whole experience a thumbs down.
Update: We tried it again with an embossing craft kit, and we loved it! It was way better than this thicker copper sheeting. You can see our new embossed crafts here: Embossed Christmas Ornaments.
Three-Dimensional Anatomy Poster
Friday, November 12th, 2010
Years ago when we studied anatomy, my children made a life-sized poster of each of the systems of the body, one by one as we studied them. The child would lie down on the butcher paper, and we would trace the real body of the child. We usually covered one system a week or one system for two weeks. We colored each system a different color so that we could distinguish which was which. It was a fun project that the children enjoyed.
Recently when I went to the state fair with my children, we saw a three-dimensional anatomy poster of two of the systems of the body: the circulatory and digestive systems. The intestine was made of panty-hose, and the stomach was a clear plastic bag with cut-out pictures of food in it. (I like humor in a project occasionally because it adds personality to the artwork.) A drinking straw was the esophagus. The heart, lungs, and trachea were made of felt, and it looked like the child stuffed it and sewed it around the edges. The brain was like the bottom part of an old-fashioned mop. It was really fun to look at!
Bible Costume in Five Minutes
Thursday, November 11th, 2010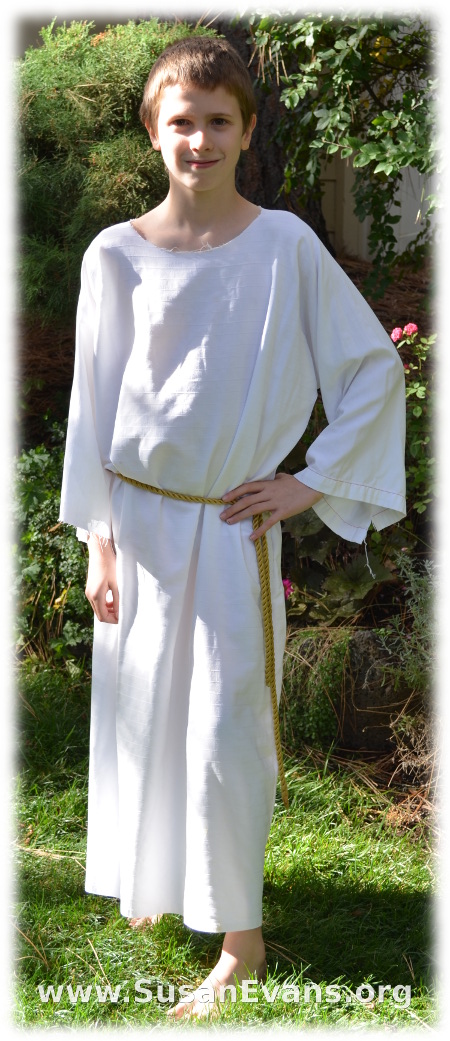 Here is a short video demonstrating how to make a Bible costume in five minutes with no sewing. (This video has over 292K views!) The costume is versatile and can be used in many different time periods.
You will need an old white bed sheet, a pair of cloth shears, and a bottle of fabric glue. You will also want a rope to use as a belt.
Fold the sheet in half. The top is where the fold is. You can have a person lie down on top of it to make sure the tunic is long enough. If not, you might want to use a queen-sized sheet or a king-sized sheet. Now cut the sheet into a T-shape. I give you a trick in the video that will help you make sure the sleeves are even.
Use fabric glue to paste the lower part of the sleeves together, and the sides of the tunic. Then cut a neck hole in the top. Throw the finished Bible costume over a chair to dry overnight. Enjoy wearing your Bible costume for limitless plays and skits to bring Scripture to life for audiences everywhere!


If you enjoyed making this Bible costume in five minutes, you will love Using Simple Costumes and Props to Teach the Bible. You receive this 2-hour video for free when you sign up for the Unit Study Treasure Vault, which has an enormous Bible section that you will love!


