Posts Tagged ‘Homeschooling’

Textured Art

Wednesday, December 4th, 2013

textured-artYou can create textured art by finding a diversity of cloths and making a picture to frame and hang on your wall. I saw this hanging on the wall of a dear friend, and I loved the idea!

If you want to create a village like this, start with the background cloth. Then add the houses and the street. You can go ahead and use fabric glue to put together the town. You might want to think through your color scheme so that the colors will blend harmoniously and not clash. Conversely, you might want to use only bold colors or pastel colors.

After getting the main shapes in place, you will want to add details. Make the doors and windows, and add even more embellishments until you have exquisite detail. If you add fuzzy moss to the rooftops, you can choose fabric that will create this illusion. Shiny fabrics can work well for metals, and velvet looks soft and mossy. You could also add lace if you are making a frilly picture.

Add any other details, like clouds in the sky, or stars and a moon. If you want shapes of animals and people to populate your village, go ahead and add them. Otherwise a beautiful town in the sunshine can be a charming piece of textured art, hanging on your living room wall.

textured-art-6

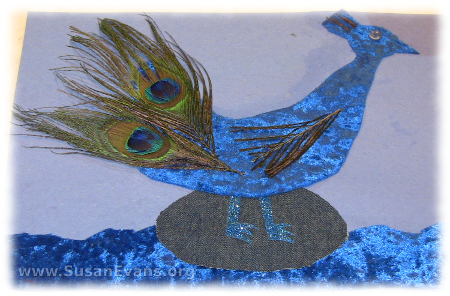
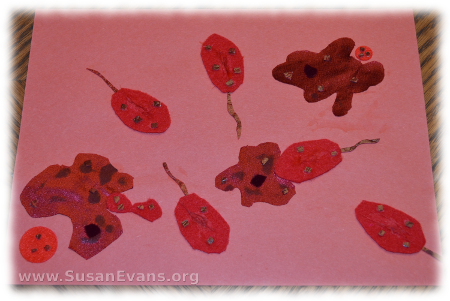
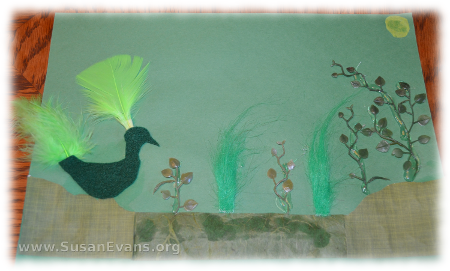
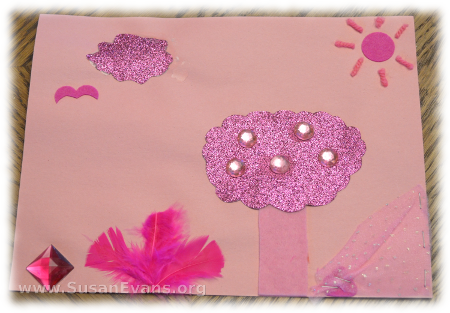
You can simplify this activity for your children by giving them one color for their textured art. For example, one of my sons loves green, so I dumped lots of green bits of materials on the table. I gave him a piece of green construction paper as a backdrop, and he had scissors and glue to create a work of art in green. My other children chose blue, pink, and red. As you can see, my son who wants to be a microbiologist has designed a red textured art piece that shows amoebas eating bacteria!

textured-art-2
textured-art-5
textured-art-3
textured-art-4

Greek Art for Kids

Monday, December 2nd, 2013

greek-art-for-kids

Are you looking for super easy Greek art for kids? This art activity is the easiest I’ve ever seen! I saw this entry at the state fair and decided to do it with my own children. All you need is orange and black construction paper, scissors, and a black marker.

You will use the orange construction paper as the background of your project. We have chosen orange because it looks like the terra cotta pottery from Greece. Now you can cut out shapes of people from the black construction paper. It might be easier to draw the figures in pencil before cutting them out. Make sure the figures all face the same direction.

For the finishing touches, take your black marker and add embellishments and twirls to the top and bottom of your paper. If you need to look at Greek pottery designs, you can look here for inspiration.

If you liked this simple Greek art for kids activity, you will love my free Ancient Greece Unit Study. You might want to subscribe to my YouTube Channel to not miss any upcoming unit study videos.

greek-art-for-kids-2

Food Web Activity

Thursday, November 28th, 2013

food-web-activity

Look at this exciting food web activity you can do with your biology students! All you need is a pile of plastic animals, a dark blue poster, string, a silver Sharpie marker, and tape. This food web activity will help your biology students to understand which animals eat which other animals. This is more complicated than the food chain that goes in a straight line that you learn about in elementary school. In real life, some animals eat each other!

Grab the dark blue poster and set it down on the table. Dump the plastic animals out of the bag. I bought a huge bag of plastic animals at a yard sale for fifty cents, so you don’t have to buy the plastic animals new. Goodwill is another source. Or you can borrow the animals from a friend with young children, and give the animals back after this activity.

Students will now set up the animals with the tertiary animals near the top, the secondary animals near the middle, and the primary animals at the bottom of the poster. You might want to include a plastic plant because many animals are herbivores. All primary animals are herbivores, so connect the string from the plant to the herbivore. Tape it down on each end. With a silver marker, draw an arrow indicating that the herbivore eats the plant. (The arrow points to the plant. Unless you want to show how the food energy flows, then do it the opposite direction.)

Continue in this way. The secondary animals eat the primary animals, but some of them also eat plants. One animal can point to more than one food source. This is why the food web looks like a tangled spider web. The tertiary animals eat the secondary animals.

You will notice that an eagle will eat a snake, but that a snake can also eat an eagle! Amazing!

For more fun biology activities, join the Unit Study Treasure Vault.


Lego Bacteria

Wednesday, November 27th, 2013

lego-bacteria

When studying about bacteria in biology, one of my sons decided to build a Lego bacteria. He used two small base plates, which he connected with black Legos representing the cell wall. Green Legos projected out of the cell wall, representing the pili used for locomotion. The flagellum is made of green Legos, and it looks like a tail coming out of the back of the bacterium. The flagellum is also used for locomotion.

The ribosomes are red Legos, and they synthesize protein in the cell. The ribosomes are what powers the bacterium because they take the DNA and turn it into protein for the cell to use. The DNA is made out of blue Legos arranged in a squiggly pattern. Without DNA, the cell would die very quickly because the ribosomes would not be able to make any protein.

Many bacteria are harmful to humans, but other bacteria help humans. People who study bacteria help us to stay healthy, which is one reason why my son wants to be a microbiologist.

If you enjoyed making Lego bacteria, you will love the biology activities in the Unit Study Treasure Vault. If you are homeschooling, your whole family can enjoy biology through the videos and activity demonstrations in the biology section of the Vault!