The plants in this hydroponic garden grow directly in water… with no soil. Every two weeks, the little green light on the bottom turns red to remind you to put two capfulls of plant food into the water. Other than that, you just top off the distilled water each day, and you get lucious herbs. Simple.
My husband got me this one from Costco, but you can get them various places and under different brands. What they have in common is that they have pods that you place into the water. These pods contain seeds which germinate when placed in water under a grow light. The grow light on this model (Aerogarden) is adjustable. You place it lower when the seeds are germinating, and as they grow taller, you raise the light higher.
How to Set Up Your Hydroponic Garden
Here is a tutorial on how to use your hydroponic herb garden:
As you can see, you fill the container with distilled water, so as not to crust over the system with harsh chemicals from tapwater. Then put the lid on, and place the herb pods into the circles.
Place the little “greenhouse” over each pod until they sprout. Then remove the “greenhouse,” allowing the plant to grow taller.
When the herbs are so tall that they touch the light, they need to be trimmed or transplanted to another container or outside.
So far we have grown herbs (including basil, parsley, and mint) and some cherry tomatoes. It’s fun to add some greenery to your home, and to have herbs available to clipping and throw into your cooking!
It’s been a while since I’ve started vegetables from seeds, so I thought I would try it again this year. We planted these back in March, so now that it’s May, we have transplanted the seedlings outside. We filmed the entire process, giving tips along the way. Make sure to check your weather forecast to make sure that it will not freeze overnight in your area before transporting the plants outside.
I show you in this video the whole process of starting vegetables from seeds:
We planted the seeds in seed trays, using seed starting mix instead of regular soil, because the seed starting mix keeps moist better. You can use old yogurt containers or other small containers instead of seed trays.
Make sure to have a grow light, which has the full spectrum of sunlight so that the seeds can get off to a good start. Otherwise you can place them in a sunny window.
Put cellophane over the rows of seeds, to keep the seeds moist and to cut down on the amount of times you need to water them.
Use a spray bottle to water, so that the seeds don’t get washed away.
Some seeds grow faster than others. Some take a few weeks to germinate. As you can see in the video, the green bean plant sprouted high above the others, reminding me of the Jack and the Beanstalk story!
Starting Vegetables from Seeds (video tutorial)
After a couple of months, you will want to transplant the seedlings outside. Some of the plants were getting too tall for the grow light, but the frost outdoors hadn’t passed yet, so I just transplanted the taller seedlings into larger containers and placed them in a sunny window.
I have a raised garden bed in partial shade, so I chose veggies that like the shade, such as lettuce and spinach, to plant in it. Then I set up a trellis next to my house, and I planted the climbing varieties of vegetables along the trellis. Green beans, for example, need a structure to climb up. You might want to stake those up with a wooden shishkabob skewer like I did in the house in the sunny window, using a twist tie to make sure they don’t fall over.
Growing your own vegetables is a great way to eat healthier and tastier food. I will be growing an even larger vegetable garden next year!
I’ve always been fascinated by treehouses, ever since, as a young girl, my parents took me to Disneyland in California, where one of the amusements was a replica of the Swiss Family Robinson treehouse from the famous classic book and movie. My young eyes widened at the thought that people could survive without electricity and running water by creating their own sustainable lifestyle, which today would be called homesteading. Being a homeschool family, my husband and I built a fort in between some trees in our backyard that looked and felt like a treehouse, complete with a rope ladder.
Over the years, the kids played in their treehouse-like fort, and we eventually went to stay the night in a large treehouse in Oregon. We filmed our experience back then and put it into the Unit Study Treasure Vault, under our description of all the hands-on activities we did for the literature unit study for Swiss Family Robinson.
Swiss Family Robinson Treehouse Tour (video)
Well, today I have a treat for you, which is a tour of the Swiss Family Robinson treehouse in Disneyworld, Florida, where my husband and I took our kids for a family reunion last summer. We walked through the entire treehouse, stopping at each area with the video camera, giving you a virtual tour:
Years ago when we read the book Swiss Family Robinson as a read-aloud, my kids were excited to draw treehouses from their own imagination. I think my oldest son was 8 years old when he created this drawing:
Years later, my sister (my kids’ aunt) and I created a 3-D model of a treehouse from odds and ends of wood and other bits of cloth and pebbles. We fastened it all together with hot glue. This is what it looked like, along with a description of how we created the entire project:
One of my younger sons (about 5 years old at the time) drew his own version of a treehouse:
So kids of any age can enjoy creating drawings and sculptures of treehouses. One year at a state fair in our area, we saw some children’s models of treehouses. The children used popsycle sticks, branches, and other odds and ends to glue together their masterpiece:
We have truly loved the Swiss Family Robinson Treehouse theme over the years, and now that we are able to give you a taste of it with this tour, we thought we’d add the drawings and treehouse models to inspire you. To find out what other hands-on activities we did for the Swiss Family Robinson unit study, you can see our cram-packed article inside our Unit Study Treasure Vault, along with our real-life overnight stay at a treehouse down in Oregon!
This year we had the opportunity to take our family to Disneyworld for the first time, for a family reunion. My husband got a bonus at work, and we got a military discount through my son Stephen, who is in the Air National Guard. It is something my husband had always wanted to do with the kids, because when he grew up in California, he used to go to Disneyland, and he had many happy memories he wanted our children to also experience.
While at Disney for four days, we entered four different theme parks: Magic Mountain, Epcot, Hollywood Studios, and Animal Kingdom. If you ever go in the summer, be aware that is is hot and humid, because that might affect your energy level. Oh, and there were downpours of rain almost every day. Regardless of the long lines, the Lord answered my prayer that my feet would hold out, and that I would not be limping through the park. That was truly a miracle because I’ve had problems with the arches of my feet, and I’ve often limped home from a short neighborhood walk.
Magic Kingdom
One of the first rides we went on was the Pirates of the Carribean. It was nearly exactly as I remembered it as a kid. Yes, even though my parents were missionsries in Guatemala, when we came up for furlough, we sometimes went (at least twice as a child) because my grandma lived near Disneyland.
The only difference that my husband noticed was the pirates were not chasing women. Instead the women were chasing the pirates, or one pirate was chasing another pirate. For those of you who remember the ride (or for those of you who have never been), we filmed the ride:
The next ride we took was the Jungle Cruise. You get into a boat, and your tour guide gives you a description of the jungle and its cartoon-like animals. He used a lot of humor, as you can see:
We rode on a lot of other rides at the Magic Kingdom on the first day: Big Thunder Mountain Railroad, Tiki Room, Haunted Mansion, and Space Mountain. Since we had entered the park at 9am, by the time it poured rain at 4pm, we were ready to go back to the hotel.
On day four, we returned to the Magic Kingdom and did the Mad Tea Party, It’s a Small World, Swiss Family Robinson Treehouse, Astro Orbiter, and Seven Dwarves Mine Train.
Epcot Center
The second day, we went to Epcot Center, which is like traveling around the world. It was an overcast day and somewhat drizzly, but we got some clear plastic rain ponchos so that we could keep going. We went to all the countries, including the ride Grand Fiesta Tour Starring the Three Caballeros in the Mexico section:
One of my favorite areas of Epcot was the Morocco section. You could walk around the cobbled streets and feel like you were at the Moroccan market. I loved all the architecture, textiles, and lamps.
Later we went to Soaring Around the World—which I LOVED! It felt like you were hang gliding around the world on a virtual ride. We also did the Mission Space, Test Track, and Spaceship Earth rides from Epcot.
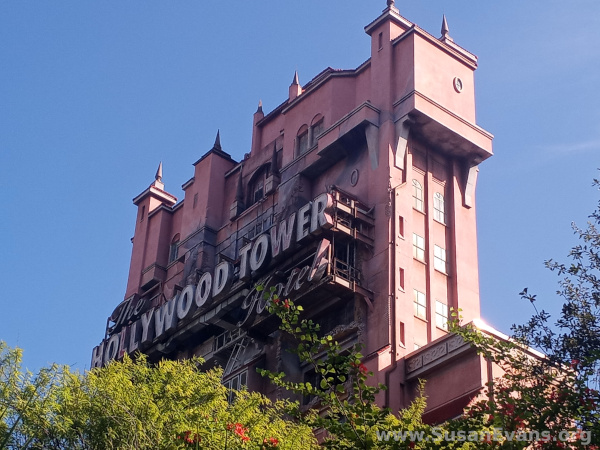
Hollywood Studios
At Hollywood Studios, we went on the Tower of Terror, Star Wars Millenium Falcon, Muppet Vision 3D, and Star Tours. The Tower of Terror is basically a Twighlight Zone episode that you are involved in, and the elevator drops. It was definitely high intensity.
Star Tours and Star Wars Millenium Falcon were both Star Wars themed rides where we were in spaceships, trying to outrun enemy ships.
The Mupper Vision 3D was super fun, where we sat in the theater of the Muppet Show, seeing everything in 3D, including the hecklers on the balcony to the right of the theater. Years ago our family created our own episode of the Muppet Show, so my whole family enjoyed this experience.
Animal Kingdom
At Animal Kingdom, we went on Expedition Everest, Kilimanjaro Safaris, and Avatar Flight of Passage. By far, my favorite ride in the entire Disneyworld parks was Avatar Flight of Passage, which was virtual reality where you ride on top of a dragon through the air, over clifftops, and through ocean waves. It was breathtaking—so much so that I rode on it twice. I never knew that one of my bucket list wishes was to fly through the air, and now I got to do it!
The Kilimanjaro Safari was a lot of fun. Come with us on our safari:
All in all, our Disney Adventure was truly magical. We got to see the fireworks at the Magic Kingdom on the final night, which we enjoyed greatly. I’m so thankful to have had the opportunity to visit Disney with my whole family, along with Alan’s sister and her kids. My kids got to know their cousins in a much more in-depth way, and I had many good conversations with my sister-in-law. It was an unforgettable trip!
Hi! I'm Susan Evans. I speak at homeschool conferences about hands-on learning and run a huge unit study membership site. I also speak at women's retreats on the topic of prayer.
I am an affiliate for Bright Ideas Press, Ultimate Homeschool Expo, and Amazon. I also do reviews for iHomeschool Network. If you buy through my links, I get part of the money. I give 10% of my website profits to missions.
Become my Affiliate
If you would like to sell my products and earn 50% commission, go here.